Populated Zones
A Populated Zone is an area that already contains Entities (Entity or Supply Types) at the start of a simulation. It must be sized to fit the relevant location, which may be the seating area of a stadium or the space within a shop, etc. Entities are introduced (or ‘seeded’) randomly into the Populated Zone at the start of a simulation.
A Populated Zone packs Entities without luggage to a maximum of 8 or 9 Entities per m2. You will receive a warning if your input tries to exceed 10 Entities per m2 and an error if it exceeds 15 Entities per m2.
Use Populated Zones wherever you need Entities to appear ‘already in the model’ at the start of the simulation. For example, you might use them in the following instances:
- Egress modelling when, for example, Entities may start within seated areas of the model. This can be useful for modelling the end of sporting events.
- Terminal modelling, where Populated Zones can be used along with Entrances to represent people already in a space, for example, waiting for trains, standing in front of an information board or en route to a destination.
Entities are directed to move away from the zone towards other destinations as soon as the simulation starts. If you want them to remain static, you need to overlay the Populated Zone with a Waiting Zone (the Copy Geometry tool can help you to do this; see Copying the geometry of Spatial Objects ).
Populated Zones only introduce Entities in the first time-step. If the space of the zone is insufficient for all Entities, those that cannot fit are discarded.
Like Entrances, Populated Zones need Demand Lines to introduce Entities into the model and you can also assign Final Destinations to the Entities.
Setting Populated Zone parameters
To set Populated Zone parameters:
- Enter a name, or choose a name from the drop-down list of imported pending objects, in the 'Name' box.
- To add a Demand Line (or Lines), click the New button once for each Demand Line you need.
-
For each Demand Line:
- Double-click in the ‘Entity/Supply Type’ column and select from the available list.
- Double-click in the ‘Population’ column and enter a number.
- Double-click in the ‘Final Destinations’ column (optional; you can assign links manually as well). If you don't want to add a Final Destination, proceed to step 9).
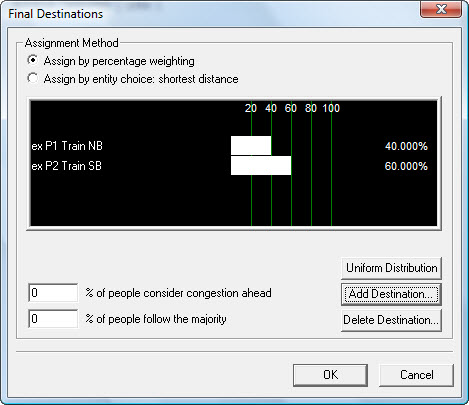
- Select one ‘Assignment Method’ from:
-
To add Final Destinations, click
Add destination.
The Select final destinations dialog is displayed.
- Expand the object trees within the dialog and select one or more destinations (press and hold the <Ctrl> key to select more than one available object).
- Click OK to add the destination(s).
-
If you want to distribute Entities evenly across your
destinations, click
Uniform Distribution.
If you want to input the distribution manually, click next to each destination name and drag the distribution bar to set the percentage (they must equal 100%).
- Click OK to return to the main parameters tab.
-
In the Link Options area, select one of these two options:
If you select 'Specify link', click on the 'Links' tab and add your target objects manually following the steps in Linking methods ).
- Click OK to save the parameters.